 |
TIPS |
|
TIPS |
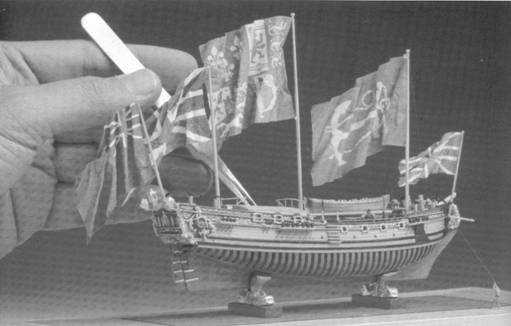
MAKING FLAGS
Courtesy of the San Diego Ship Modelers Guild
|
1. Find the flag you want from a book or the plans that come in the kit. 2. Scale out to the size you'll need for your model. 3. With a Xerox machine blow-up or reduce to the needed size. 4. Put a clean piece of paper over your Xerox and trace it over a light box on both sides. 5. Cut out your flag leaving some extra on one side, about 1 ", as a "handle" to work with. 6. Fold & crinkle up to the handle. 7. Dip into water to kill the memory the paper has, re-crinkle into shape, and lay it out on a paper towel to dry; 8. Paint with Acrylic Paint using the lightest color first (yellow), since the paper is white you don’t have to worry about that color. Allowing enough time to dry before doing the other side. 9. Once you've finished with one color go to the next color, and repeating process #8. 10. 'When your finished painting and it’s dry, trim off the handle but leave two small tabs at the top and bottom. Re-crinkle the flag into shape and attached to the mast or ensign staff. Materials You Will Need:
|