 |
TIPS |
|
TIPS |
PLEXIGLASS CASE
DETERMINE MATERIALS NEEDED
Determine the maximum model ship dimensions and record them on the attached sheet. The height includes any existing model display stand thickness. Add clearance margins to establish the Plexiglas case size and record the results on the sheet. The clearance margins are:
Forward 1"
Aft 1"
Sides 1/2" each side
Top 1"
Other clearance margins can be used as desired.
Complete the
worksheet to determine the size of materials for the wood base and the Plexiglas
panes.
Purchase the wood base at a local lumber store and have it cut to the "buy" size. The wood base is 1/4" thick.
Order the Plexiglas panes to the finished size specifying that the edges are to be finished flat for gluing purposes. Usually, stores that provide glass also sell Plexiglas.
Order a 1 " x 3" brass plaque (optional) from a trophy shop made with desired notations.
PREPARE THE WOOD BASE
Check the oak wood base for proper dimensions. Use a router to trim 1/8" off each end and each side of the wood base to get a clean and flush appearance. Do the ends first using an end block to avoid wood splitting. Use a flush veneer straight trimmer bit.
Use a 3/8" rabbet bit with the router to form a 7/16" deep cut which will leave a 5/16" lip on which the Plexiglas will rest (see drawing). Only route 1/8" at a time. Decide on the location of the screws to secure the model to the wood base and drill the holes. Sand the base to the desired finish.
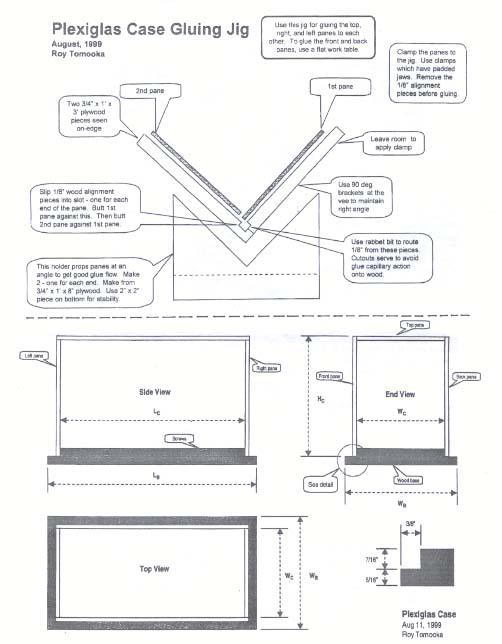
GLUE THE PLEXIGLAS CASE
Verify the Plexiglas pane sizes. Determine where the four screws are be placed for attaching the case to the wood base. Usually, 5" or 6" from the corners is adequate for smaller ships. More screws should be added for larger ships. Drill countersunk holes in the panes for the screws.
For glue use IPS Weld-On 3 or a similar product. It is a clear, water-thin, very fast curing solvent cement for joining acrylic (Plexiglas and Lucite). It contains methylene chloride whose vapor may be harmful. Follow directions with adequate ventilation. Use a syringe with a fine needle point. These can be obtained at South Bay Plastics at the corner of Torrance Boulevard and Normandy Avenue in Torrance,CA.
First glue the right hand pane to the top pane using a 90 degree gluing jig to ensure square corners and to make assembly easier. Detailed gluing procedures follow:
1. Remove the Plexiglas protective paper near the edges to be glued.
2. Place the larger top pane on the gluing jig. Slip a piece of alignment wood (1/8") in the V- grooves at each end of the pane and push the pane against it. This aligns the edge of this pane with the side of the other pane to be glued. Clamp the top pane to the jig. Use clamps which have padded jaws to avoid marring the Plexiglas surface. Remove the alignment pieces,
3. Place the second pane on the other side of the jig at a right angle and clamp it tightly to the jig. Place close attention to the positioning of the panes noting which pane overlaps the other. Tilt the jig so the glue can flow downwards if feasible. This is not mandatory, but helps. Double check to ensure the panes are pressed together, have good contact, and the edges are aligned.
4. You are now ready to apply the glue relying on capillary action for the glue to spread. Use the syringe applicator applying firm and steady pressure on the plunger. Apply the glue pushing a small amount of glue ahead of the applicator for good spreading action and coverage. Too much glue causes unsightly pooling. Too little glue causes weakness and air bubbles. Let the glue set for 30 minutes.
5. When removing the panes from the jig, minimize any sudden or jerky movement which might weaken the joints.
Glue the left pane to the top pane using the above procedures. If the panes stick out from the jig a lot or are highly cantilevered, apply corner braces using a 2" x 2" piece of wood clamped at the corners. Use lightweight plastic clamps. An alternate would be to place the jig in a horizontal position.
Now you are ready to glue the front pane. When gluing the front and back panes (usually the largest), lay the assembly on a flat table with the pane to be glued on the bottom. Use a large stiff piece of 3/4" plywood covered by a protective towel. Place wood boards (1 " x 6" x 2' or 3') on the vertical edges and place weights on the board. Six packs of soft drinks works fine. This weight provides the necessary pressure to ensure good contact and a good bond. Now apply the glue as indicated above.
Finally, glue the rear pane into position using the technique in the prior step. Allow the assembly to dry overnight.
FINAL ASSEMBLY
Place the Plexiglas case over the wood base. You may have to trim the base so the case can easily slip onto the wood base. Mark the attachment holes using the countersunk holes in the case as guides. Remove the case and drill the holes.
Make the plaque holder (optional) from a 1/4" x 1 1/2" oak board with one edge trimmed at 22 degrees using a router bit. The 22 degree edge gives a nice slant to the plaque for the viewer. Drill holes for plaque screws as necessary. Sand and oil the plaque holder with Floquil Swedish Oil.
Oil the wood base also at this time. Add felt pads to the bottom of the wood base. Attach the model to the wood base. Attach the optional plaque to the plaque holder with brass screws or use double-sided tape on the back. Glue the plaque holder to the wood base.
Perform a final cleaning and dusting of the model ship. Use brushes and compressed air that comes in an aerosol container. Clean the Plexiglas case with Plexus, or a similar product, which is a special Plexiglas anti-static plastic spray cleaner, protectant, and polish. Use a soft clean cloth. Attach the Plexiglas cover onto the wood base with brass screws.